Main Page
Welcome to the vArranger Online Manual.
1.OVERVIEW VIRTUAL ARRANGER vA2
INSTALLATION
After ordering on the website:http://www.varranger.com/Buy_Now.php You will receive the
installation instructions within 24 hours, and the vArranger software download email.
You can choose between two modes of installation:
- Installation on your computer (requires no USB, but only works on a single computer)
- Installation on your USB brand (Kingston, Sandisk...), so you can use the software on any
computer by plugging the USB key before launching vArranger.
This choice is final.
Default vA2 starts in full screen, double click on the bottom of its main window allows the
dimension at will and a right click opens a popup window for  recording the starting position of the main window
Fig1: Interface vA2
WINDOW PROGRAM
OPTIONS
This window shows the available options for the vA2. It allows to configure midi ports, controllers, song chords,Master, Arabic scale. The effects is only available in the yamaha mode.

MIDI PORTS
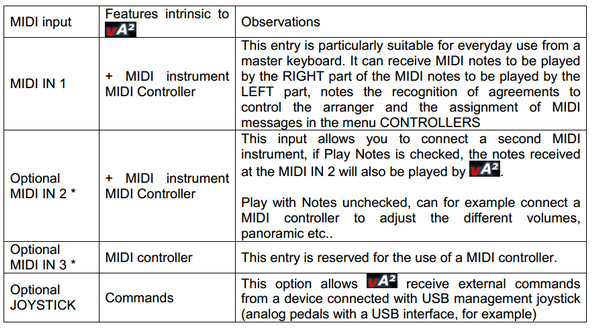
This window allows you to choose or MIDI interfaces that will be active in IN and OUT from those connected to the computer. vA2 can be controlled by one, two or up to three MIDI inputs with the following features:
- Provided that the MIDI interface is provided with several MIDI IN input.
KEYBOARD MODE: By default vA2 KEYBOARD MODE is configured on the MIDI CHANNEL 1 (Fig. 4)
 ACCORDION MODE: This mode is activated by selectingMIDI ACCORDION, it is then possible
to set the MIDI channel for the right hand (Right),the MIDI channel for the left hand (Left) and
the MIDI channel for Bass (Bass).
Now, only the MIDI ports used are displayed
This window also enables a second and a third MIDI input (MIDI pedal for example)
MIDI LED FEEDBACK
Some MIDI controllers such as the KORG nanoKONTROL2have buttons that can illuminate,
these lights can beings controlled via MIDI.
VIDEO: http://youtu.be/otV1oLeaLRE
This option gives you a visual acknowledgment without having to look at the computer screen.
For example, we assign 4 buttons variations ABCD arranger, button change during turns.
This option is active in OPTIONS / MIDI PORTS.
In the figure below is selected in the MIDI controller MIDI IN 2nd by checking the LED feedback
box this MIDI (Fig. 6) entrance, you can choose theMIDI port to accept control LED (fig. 7)


Note: To accept the control of LEDs, MIDI controller may require adjustments. For example, for
the KORG nanoKONTROL2 the KORG Kontrol Editor program (available on the website
KORG) and select is used:
- CONTROL MODE = CC
- LED MODE = EXTERNAL


