5.10. MIXER: Difference between revisions
| Line 1: | Line 1: | ||
== THE MIXER PANEL == | == THE MIXER PANEL == | ||
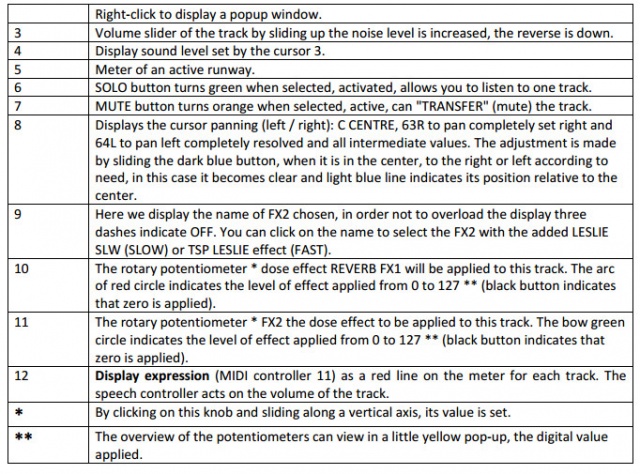
<p>The mixer group has 16 'strips', one for each 'track' as in the image below. Each track represents one of the 16 midi channels of the multitimbral midi synthesizer.</p> | |||
<p> Each track can be one of the following: | |||
<ul> | |||
<li>An arranger track</li> | |||
<li>A midifile track</li> | |||
<li>A left hand track</li> | |||
<li>A right hand track </li> | |||
</ul> | |||
</p> | |||
<p>'''MIDI channel numbering can be confusing. MIDI Channels are named 1 to 16, but they are represented by physical numbers that are one less than that, i.e., 0 to 15. The numbers shown below are the ''physical'' number. To get the MIDI logical channel number, Please add +1 to all "Channel MIDI" in left column'''</p> | |||
<p>Generally you can check this by looking at the number for the drums channel, which by convention is normally MIDI logical channel 10.</p> | |||
<p>As and example: RIGHT1 below is MIDI Channel 13</p> | |||
<p>Please not also that the mixer strips in arranger mode are ordered as in the centre column below. </p> | |||
<p>For MIDI and Karaoke files, the channels to which the sounds are sent, and that the strips control, are in the right-most column below.</p> | |||
[[File:Tabelle7.jpg | 480px | center]] | |||
<br> | <br> | ||
''' | |||
'''< | <p>The following may be clearer '''if I have it correctly'''. All MIDI/Track numbers below are MIDI channel names 1 to 16, rather than the physical coding 0 to 15</p> | ||
<table border align="center"> | |||
< | <tr><td colspan=4 align="center">Try a table version</td></tr> | ||
<tr><th align="center">Strip</th><th align="center" colspan="2">Arranger</th><th align="center">MID/KAR Play</th></tr> | |||
<tr><th align="center">Number</th><th align="center">Track Name</th><th align="center">MIDI channel</th><th align="center">MIDI Channel</th></tr> | |||
<tr><td align="center">1</td><td align="center">Drums</td><td align="center">10</td><td align="center">Track 1</td></tr> | |||
<tr><td align="center">2</td><td align="center">Percussion</td><td align="center">9</td><td align="center">Track 2</td></tr> | |||
<tr><td align="center">3</td><td align="center">Bass</td><td align="center">5</td><td align="center">Track 3</td></tr> | |||
<tr><td align="center">4</td><td align="center">Accomp 1</td><td align="center">6</td><td align="center">Track 4</td></tr> | |||
<tr><td align="center">5</td><td align="center">Accomp 2</td><td align="center">7</td><td align="center">Track 5</td></tr> | |||
<tr><td align="center">6</td><td align="center">Accomp 3</td><td align="center">8</td><td align="center">Track 6</td></tr> | |||
<tr><td align="center">7</td><td align="center">Accomp 4</td><td align="center">11</td><td align="center">Track 7</td></tr> | |||
<tr><td align="center">8</td><td align="center">Accomp 5</td><td align="center">12</td><td align="center">Track 8</td></tr> | |||
<tr><td align="center">9</td><td align="center">Left 1</td><td align="center">3</td><td align="center">Track 9</td></tr> | |||
<tr><td align="center">10</td><td align="center">Left 2</td><td align="center">4</td><td align="center">Drums 10</td></tr> | |||
<tr><td align="center">11</td><td align="center">Left 3</td><td align="center">1</td><td align="center">Track 11</td></tr> | |||
<tr><td align="center">12</td><td align="center">Right 1</td><td align="center">13</td><td align="center">Track 12</td></tr> | |||
<tr><td align="center">13</td><td align="center">Right 2</td><td align="center">14</td><td align="center">Track 13</td></tr> | |||
<tr><td align="center">14</td><td align="center">Right 3</td><td align="center">15</td><td align="center">Track 14</td></tr> | |||
<tr><td align="center">15</td><td align="center">Right 4</td><td align="center">16</td><td align="center">Track 15</td></tr> | |||
<tr><td align="center">16</td><td align="center">2nd Voice</td><td align="center">2</td><td align="center">Track 16</td></tr> | |||
</table> | |||
<br> | <br> | ||
<p align="center">'''A mixer strip.'''</p> | |||
<br> [[File:Fig65.jpg | 240px | center]] | |||
<br> | |||
[[File:Fig65.jpg | 240px | center]] | |||
[[File:Tabelle8.jpg | 640px | center]] | [[File:Tabelle8.jpg | 640px | center]] | ||
[[File:Tabelle8a.jpg | 640px | center]] | [[File:Tabelle8a.jpg | 640px | center]] | ||
Revision as of 17:45, 17 February 2016
THE MIXER PANEL
The mixer group has 16 'strips', one for each 'track' as in the image below. Each track represents one of the 16 midi channels of the multitimbral midi synthesizer.
Each track can be one of the following:
- An arranger track
- A midifile track
- A left hand track
- A right hand track
MIDI channel numbering can be confusing. MIDI Channels are named 1 to 16, but they are represented by physical numbers that are one less than that, i.e., 0 to 15. The numbers shown below are the physical number. To get the MIDI logical channel number, Please add +1 to all "Channel MIDI" in left column
Generally you can check this by looking at the number for the drums channel, which by convention is normally MIDI logical channel 10.
As and example: RIGHT1 below is MIDI Channel 13
Please not also that the mixer strips in arranger mode are ordered as in the centre column below.
For MIDI and Karaoke files, the channels to which the sounds are sent, and that the strips control, are in the right-most column below.
The following may be clearer if I have it correctly. All MIDI/Track numbers below are MIDI channel names 1 to 16, rather than the physical coding 0 to 15
| Try a table version | |||
| Strip | Arranger | MID/KAR Play | |
|---|---|---|---|
| Number | Track Name | MIDI channel | MIDI Channel |
| 1 | Drums | 10 | Track 1 |
| 2 | Percussion | 9 | Track 2 |
| 3 | Bass | 5 | Track 3 |
| 4 | Accomp 1 | 6 | Track 4 |
| 5 | Accomp 2 | 7 | Track 5 |
| 6 | Accomp 3 | 8 | Track 6 |
| 7 | Accomp 4 | 11 | Track 7 |
| 8 | Accomp 5 | 12 | Track 8 |
| 9 | Left 1 | 3 | Track 9 |
| 10 | Left 2 | 4 | Drums 10 |
| 11 | Left 3 | 1 | Track 11 |
| 12 | Right 1 | 13 | Track 12 |
| 13 | Right 2 | 14 | Track 13 |
| 14 | Right 3 | 15 | Track 14 |
| 15 | Right 4 | 16 | Track 15 |
| 16 | 2nd Voice | 2 | Track 16 |
A mixer strip.
SECTION SOUND EDIT
Double-click on one of the 16 tracks opens the SOUND EDIT window. Once the window is open, a single click on other tracks, update the SOUND EDIT window.
The RIGHT 1, 2, 3, 4, 2nd VOICE, LEFT 1, 2, 3 tracks allows to create simple or more complex presets, and the following parameters are added:
- A keyboard play area:
- Key From and Key To allow you to select the range of keys(notes) for an action.
- Define the Key From note by clicking on the displayed value and then play the keyboard the desired note (the number will be displayed.).
- Define the Key To note by clicking on the displayed value and then play the keyboard the desired note (which may not be less than From Key).
- A velocity range:
- Velocity From Sets the value of the strike force from which the note will be generated. A low value corresponds to "light" the maximum is "Sforzando."
- Velocity To Sets the value of the strike force from which the note will no longer generated. This value can not be less than Velocity From.
- An octave change.
- A transposition in semitones.
- Key From and Key To allow you to select the range of keys(notes) for an action.
These special lanes and 2nd RIGHT and LEFT VOICE allow for example to produce a different tone and a different velocity according to the octave played
Once these parameters are set, you can save the preset using SAVE SOUND.
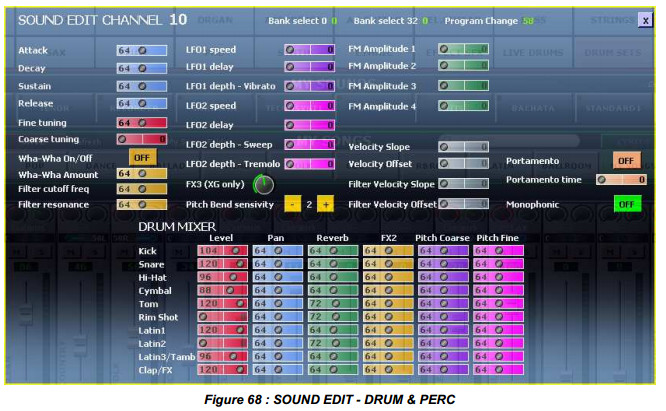
- Additional for the DRUM and PERC tracks only
- Right-click on the DRUM or PERC track and select DRUM MIXER... to access the additional extra settings for the percussion tracks.
Particularity of the BASS track
You have the ability to save the MANUAL BASS SUSTAIN. To do this, select Manual Bass, double click on the bass track, and change the value of the Release Time. You can then save this setting in SAVE STARTUP CONFIG.
SAVE SOUND
SAVE RIGHT SOUND is available from the button ![]() and "SOUND ..." The following parameters are stored in SAVE RIGHT SOUND:
and "SOUND ..." The following parameters are stored in SAVE RIGHT SOUND:
By combining up to 5 tracks (RIGHT 1, 2, 3, 4 and 2nd VOICE) it is easy to create new complex sounds.
CONTEXT MENU TRACK
Right click on a track displays a context menu that allows the following selections:
For example, right click ACCOMP4:
SEND TO MIDI
This menu allows you to route MIDI track this information to multiple MIDI outputs, these
choices are not mutually exclusive.
Note : It is possible to use multiple MIDI interfaces with the same names of MIDI ports.
SOUND EDIT ...
See Section 5.10.2 SOUND EDIT
DRUM MIXER ...
See Section xxx DRUM MIXER
STYLE MIXER ...
This command displays summary screen settings current style for each track, and each
variation.
GROUP MASTER/EFFECTS
This group has 4 channels and adjustment effects two groups:
The first track named SONG, we read a sequence or an audio file, or STYLE for the use of a
style rule by moving the cursor vertical level of the sequence, or the audio file type (0-127)
The second channel named ![]() adjusted by means of the vertical level of the cursor LEFT section (0 to 127). This path can be selected, which causes the display option
adjusted by means of the vertical level of the cursor LEFT section (0 to 127). This path can be selected, which causes the display option ![]() in VOICE. This feature allows you to associate a bar SOUNDS MY STYLE. A right-click displays
the popup menu cf. 5.10.4.
in VOICE. This feature allows you to associate a bar SOUNDS MY STYLE. A right-click displays
the popup menu cf. 5.10.4.
The third path named in ![]() adjusted by means of the vertical level of the cursor RIGHT section (0 to 127). This path can be selected, which causes the column display stamps allowing choice. A right-click displays the popup menu cf. 5.10.4.
adjusted by means of the vertical level of the cursor RIGHT section (0 to 127). This path can be selected, which causes the column display stamps allowing choice. A right-click displays the popup menu cf. 5.10.4.
The fourth track named MAST rule acting on the vertical ![]() rule acting on the vertical slider overall output level (MASTER) from 0 to 127.
rule acting on the vertical slider overall output level (MASTER) from 0 to 127.
Above, another digital indicator shows white numerals on a black background, it is of polyphony,
in other words, the number of notes "ON" sent to the sound module. This allows for example,
whether vA2 is receiving MIDI data from the device connected to MIDI IN.
The first group of effects named FX1-REVERB can select a reverb type from eight types of
which OFF (no reverb). The choice is made by clicking on the name of the REVERB in use, a
drop-down list displays the different reverbs available.
By clicking on the bottom of the window vA2 It clears the combo box without applying the
changes.
The maximum level is adjustable reverb chosen in another drop-down list of values: 0 to 16.
The second effect group named FX2 can choose different types of CHORUS DELAY DISTO to
be applied to different tracks vA2 Eight different types are available including an OFF for all
three FX2 effects. By clicking on the bottom of thewindow vA2 It clears the combo box without
applying the changes.


